How to make Starlink faster: Practical ways to improve speed and reliability


Starlink was designed to deliver high-speed, low-latency internet in areas where traditional broadband struggles, including rural and remote regions and environments with limited infrastructure. It typically provides download speeds between 45Mbps and 280Mbps under normal conditions, with most users getting speeds over 100Mbps under normal conditions.
However, because Starlink relies on satellites, its performance varies depending on network congestion, equipment setup, and environmental conditions. If your connection feels slower than it should, there are practical steps you can take to improve it.
This guide explains how dish placement and router setup affect Starlink performance, which settings reduce latency and improve reliability, and how to troubleshoot common issues.
Why is my Starlink slow?
Starlink uses low Earth orbit (LEO) satellites rather than fixed ground infrastructure. Your dish continuously connects to satellites moving overhead and switches between them throughout the day. These handoffs, along with routing through ground stations, can introduce natural variability in speeds.
As a result, Starlink speeds can fluctuate more than traditional internet fiber or cable connections. Slower performance is often tied to normal network conditions or setup factors rather than a fault with the service.
Here are the most common reasons Starlink speeds feel slower than expected.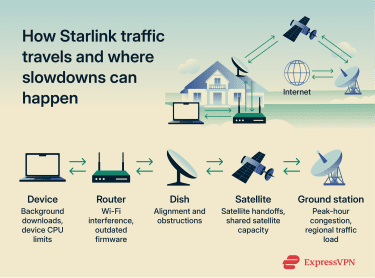
Satellite congestion and peak usage times
Starlink satellites serve many users within the same coverage area. During peak hours (typically between 6 pm and 11 pm local time), when more people stream, game, or video call, available bandwidth is shared across more connections. This can reduce download speeds or increase latency, especially in high-demand regions.
These slowdowns are usually temporary and often ease during off-peak hours, such as late night or early morning.
Obstructions and line-of-sight issues
Objects like trees, buildings, utility poles, and chimneys can interfere with your signal in ways that aren't immediately obvious. For instance, a swaying tree branch can block the dish's view for seconds at a time as satellites pass overhead. Even brief obstructions can cause short dropouts that appear as slower speeds, buffering, or higher latency.
Since satellites move across the sky, your dish needs a wide, unobstructed field of view rather than just a clear patch of sky in one direction.
Weather and environmental factors
Heavy rain, snow, and heavy cloud cover can weaken the connection between your dish and satellites. While Starlink is designed to operate in most conditions, unfavorable weather such as rain may temporarily reduce signal quality by around 50% in some locations. Strong winds can shift the dish or mount slightly, causing brief interruptions. These effects are usually short-lived and improve once conditions stabilize.
Router limitations vs. dish performance
Sometimes the issue isn't the satellite connection but your local network setup. Wi-Fi coverage, interference, and router placement can significantly affect real-world performance.
Wi-Fi signals weaken as they pass through walls and floors, and interference from nearby devices can reduce performance. Similarly, if you’re using several devices at once to stream, download, or video call, bandwidth is divided among them, which can slow speeds across the network.
How to test your Starlink speed
Run speed tests at different times and on different days to establish a baseline. Test during off-peak hours to see maximum potential speeds, then during peak hours to see how much congestion affects your connection.
Avoid testing immediately after rebooting or during firmware updates. Wait at least 10–15 minutes to let the connection stabilize.
When evaluating your results, consider what you use your connection for. For browsing and streaming, download speed matters more. For video conferencing, upload speeds and latency are more important. For gamers, latency is your top priority. Lower latency means faster response times.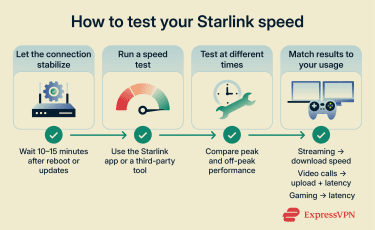
Testing with the Starlink app vs. third-party tools
The Starlink app’s built-in speed test measures the speed between your router and the Starlink network. This diagnoses dish-related issues like obstructions or hardware problems.
Third-party speed test tools, like Ookla Speedtest, Fast.com, or Google's speed test, measure the speed from your device to internet servers, including local network performance (Wi-Fi or Ethernet), and reflect your actual browsing, streaming, or downloading experience.
It’s best to use both types of tests together. The Starlink app test isolates dish performance, while third-party tests show real-world speeds. Comparing them helps identify where bottlenecks occur.
If the Starlink app shows high speeds but third-party tests are low, the problem is likely with your local network. If both are low, dish, satellite connection, or network congestion issues are more likely.
When slower speeds are normal
In addition to speed drops related to unfavorable weather conditions and peak hours, Starlink’s deprioritization can also affect your speeds.
Many Starlink plans include priority data limits: a set amount of high-priority data you can use each month. Once you exceed that limit, your speeds may be deprioritized during times of network congestion, meaning you’ll still be connected but could see noticeably slower speeds until the next billing cycle begins.
How to improve Starlink speed
Improving Starlink speed comes down to optimizing how your equipment is installed, connected, and configured. Small adjustments can reduce interruptions, improve signal quality, and increase consistency.
Improve Starlink dish placement
Where you place your Starlink dish directly affects how reliably it can communicate with satellites.
Use the obstruction detection tool in your Starlink app to scan your dish’s field of view and identify blockages. Open the app, select your Starlink system, and tap Check for Obstructions. Point your phone camera at the sky from your dish’s location, and the app will highlight any objects in the way.
If the app shows obstructions, relocate your dish to the clearest possible sky view. Even moving it a few feet can improve performance noticeably. Aim for 0% obstructions. Anything above 5% might significantly affect your connection.
Mount the dish as high as practically possible, such as on a roof or pole, for the best satellite visibility. Ground-level installations are more likely to be blocked by structures, vehicles, or vegetation.
Consider surrounding trees when mounting your dish. Even if your dish has a clear view now, seasonal foliage may change that. Trees that are bare in winter may block your signal when leaves grow back in spring and summer. Choose a location that stays clear year-round.
Pro tip: Check Google Maps’s satellite view and look at imagery from previous summers to spot where the tree canopy is thickest during peak growing season.
Use a stable mount to prevent movement in strong winds. Even small shifts can cause packet loss, where data fails to reach its destination and must be resent, leading to delays, buffering, or brief connection drops.
Optimize your Starlink router setup
Once the satellite connection is stable, your home network is the next potential bottleneck.
Router placement
Place your router as centrally as possible within the area where you use the internet most. Avoid corners, closets, or enclosed spaces. Wi-Fi signals spread outward from routers, and walls, floors, and furniture weaken them. Position the router at about desk or shelf height for better coverage.
Keep the router away from appliances like microwaves, cordless phones, baby monitors, and Bluetooth devices. They operate on similar frequencies and can disrupt Wi-Fi performance. Metal surfaces, large mirrors, and aquariums can also reflect or block signals.
Splitting Wi-Fi bands
Most Starlink routers support both 2.4GHz and 5GHz Wi-Fi bands. The 2.4GHz band has a longer range and better wall penetration but is slower and more susceptible to interference. Under typical home conditions, it maxes out at around 100Mbps. The 5GHz band is faster and less crowded but has a shorter range and worse wall penetration. When you’re close to the router with a strong signal, it can deliver speeds up to around 1Gbps.
By default, routers automatically assign devices to the most appropriate band, and most users won’t need to change this. Consider manually splitting bands only if you have 10 or more connected devices, you’re experiencing noticeable Wi-Fi congestion, or you want to prioritize specific devices for gaming or work.
Use 5GHz for high-speed devices near the router, such as computers, gaming consoles, and streaming devices. Use 2.4GHz for devices farther away or those that don't need as much bandwidth, such as smart home devices or older phones.
To split the Wi-Fi bands on your Starlink:
- Open the Starlink mobile app and go to Settings.
- Select Router > Network > [Your Starlink Wi-Fi name].
- Toggle on Split 2.4 / 5 GHz networks.
- Rename each band to tell them apart (for example, add “2.4” and “5” to the network names).
- Save the changes and restart your router.
Advanced: Bypass mode and third-party routers
Bypass mode is a feature of newer router models, such as the Gen 3 router and Router Mini. It works similarly to bridge mode, disabling the Starlink router’s Wi-Fi so you can use your own third-party router with a better range, a custom Domain Name System (DNS), or mesh expansion capabilities.
Bypass mode can be enabled directly in the app (under Settings). Once activated, you connect your third-party router to the Ethernet port on the Starlink router. A violet indicator light confirms that bypass mode is active.
Without bypass mode, using both the Starlink router and a third-party router creates a double network address translation (NAT) setup. This can complicate port forwarding and interfere with some online games, video calls, virtual private networks (VPNs), and remote access features that rely on inbound connections. While the latency impact is usually small, bypass mode simplifies your network and avoids these compatibility issues by letting your other router handle NAT directly.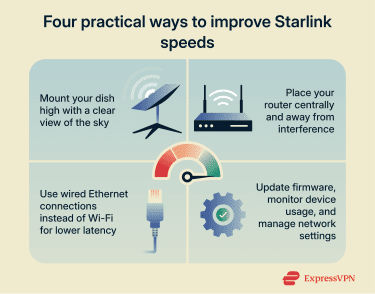
Use Ethernet instead of Wi-Fi (when possible)
While Wi-Fi is convenient, Ethernet is generally faster and more stable. A direct router-to-device Ethernet connection eliminates interference, signal degradation, and the management overhead Wi-Fi uses to coordinate devices and maintain the connection. This results in lower latency, consistent speeds, and fewer dropped connections.
Wi-Fi is generally fine for casual browsing and streaming, but for low-latency activities like gaming, video conferencing, or large file transfers, Ethernet is the better option.
Note that Starlink Gen 2 dishes require an Ethernet Adapter (sold separately) for wired devices. Gen 3 dishes have built-in Ethernet ports on routers, so you don’t need an adapter.
Before switching to Ethernet, check the condition of the Starlink cable. Kinks, sharp bends, or long-term UV exposure degrade performance over time.
Optimize software and network settings
Beyond hardware and placement, software adjustments can also improve speeds and stability.
Firmware updates
Starlink regularly pushes firmware updates to improve performance, fix bugs, and optimize satellite communication.
Most updates install automatically. However, you can check that your system is up to date in the app. Go to Settings, select your Starlink system, and look for the firmware version. Available updates will appear in the app.
Rebooting your Starlink system can sometimes resolve issues with your Starlink connection. For a quick reboot, unplug the router for 20–30 seconds, then plug it back in. For a deep reset that clears cached data, wait for about 20 minutes before plugging it back in. Either way, the system takes a few minutes to restart and reconnect. Reboot during periods when you don’t need to use the internet.
Custom DNS settings
Devices use DNS to translate website addresses into IP addresses. By default, Starlink uses its own DNS servers, but switching to a faster public DNS service can reduce website lookups and slightly improve page load times. Cloudflare (1.1.1.1) and Google (8.8.8.8) are common options.
To change DNS settings on a Starlink router:
- Open the Starlink app and go to Settings.
- Select Router, then under Advanced, tap Custom DNS.
- Enable custom DNS and enter your preferred DNS addresses (for example, 1.1.1.1 and 1.0.0.1 for Cloudflare).
- Save your changes.
Note that changing DNS won't increase download or upload speeds, but it can make browsing feel faster. And while it hides your DNS queries from your internet service provider (ISP), it can still see the IP addresses you connect to. For full privacy, you need to use a VPN with Starlink.
Address Starlink latency issues
Starlink latency typically falls in the 25–60ms range. This is higher than fixed cable or fiber broadband, which often has median latency around 9ms, and higher than 5G under strong signal conditions, where latency can drop to roughly 1–10ms. Long Term Evolution (LTE) latency is usually closer to Starlink, typically ranging between about 30ms and 70ms depending on coverage and network congestion.
Starlink latency can increase due to:
- Satellite handoffs as satellites move in and out of range.
- Network congestion when many users are active at the same time.
- Brief obstructions that cause retransmissions.
- Distance from the nearest ground station.
For real-time activities like gaming or video conferencing, these fluctuations are more noticeable. To reduce their impact:
- Schedule latency-demanding tasks during off-peak hours.
- Limit background activity, such as large downloads or cloud backups, during calls or gaming sessions.
- Use Ethernet instead of Wi-Fi for devices that require stable, low-latency connections.
Troubleshooting: When simple fixes don't work
If Starlink speeds stay slow or inconsistent after optimizing your setup, work through these practical steps.
Deep power reset
Standard router reboots fix temporary glitches, but deep resets go further by forcing systems to fully clear memory and re-establish all connections from a clean baseline.
Consider a deep power reset if:
- Speeds have been unusually slow for 24 hours or more.
- You’re experiencing frequent disconnects.
- Devices connect to Wi-Fi but have no internet access.
- A standard reboot (unplugging for 20–30 seconds) didn’t resolve the issue.
- Performance issues started after a firmware update or after moving your dish.
To deep reset your Starlink router, unplug the router for 20 minutes to reset all temporary configurations and cached data.
Plug the power cable back in and wait 5–10 minutes for the dish to complete its startup sequence.
Check the network tab in the Starlink app
If your overall connection works but speeds seem slow, one device might be using most of your bandwidth.
Open the Starlink app and navigate to the Network tab to see all connected devices and how much data each one is using. Look for devices with unusually high usage. For example, if most devices are using only a few Mbps, but one is pulling tens or hundreds, that device is likely the culprit.
Common bandwidth hogs include devices running automatic backups, software updates, and game downloads. If you identify a device using excessive bandwidth, pause the activity or temporarily disconnect it in the Starlink app by tapping the device name and selecting Block Device.
To prevent recurring slowdowns, adjust the backup or update schedule directly in your device’s settings, such as Windows Backup settings, macOS Time Machine, iCloud settings, or your console’s update preferences, and set large downloads to run during off-peak hours.
FAQ: Common questions about making Starlink faster
How can I increase my Starlink speed?
There are several ways to increase your Starlink speed. Check for obstructions using the Starlink app, mount the dish higher, and ensure it has a wide, clear view of the sky. Inside, place the router centrally, reduce Wi-Fi interference, and use Ethernet for devices that need stable connections. These steps won’t eliminate all slowdowns, but they can significantly improve consistency.
Why is my Starlink so slow at night?
Evenings are typically the busiest time on the network. As more users stream, game, or video call, available bandwidth is shared across more connections. This can lead to slower speeds or higher latency until usage drops later at night or early in the morning.
Is Starlink faster than 5G or LTE?
This depends on location and network conditions. In general, Starlink is typically faster than Long Term Evolution (LTE), while it can rival or trail 5G depending on local coverage and network quality.
Can dish placement affect Starlink signal strength?
Yes. In fact, dish placement is one of the most important factors affecting Starlink signal strength. Obstructions such as trees and buildings interrupt signals as satellites move overhead. Mounting dishes higher and ensuring a clear line of sight reduces dropouts and improves overall stability.
Does weather impact Starlink speed?
Yes, rain, snow, or strong winds can temporarily affect performance. These effects are short-term, and speeds return to normal once conditions improve.
What is the best way to reduce latency with Starlink?
While latency can’t be eliminated entirely, you can reduce its impact. Use Ethernet for latency-sensitive activities, limit background downloads during video calls or gaming, and schedule demanding tasks during off-peak hours. Stable dish mounts and minimal obstructions also reduce brief interruptions that increase delay.
Take the first step to protect yourself online. Try ExpressVPN risk-free.
Get ExpressVPN